Repeato
  • Features
  • Pricing
  • Blog
  • Resources
  • Get for free
  • Getting started
  • Running test batches
  • Reporting
  • Test devices
  • Screenshot testing
  • Test exception handling
  • Tags
  • Automate switching devices
  • Advanced Configuration
  • Test workspaces
  • Advanced testing techniques
  • JavaScript API
  • Share tests within the team
  • Continuous Integration Support

Share tests within the team

Table of contents
  1. Syncing your workspace via Cloud Sync
    1. Key points
  2. Syncing your workspace via Git
    1. How to start versioning test automation files via Git?
    2. How to get the changed tests from your teammates
    3. Benefits of using Git for syncing files?
    4. Which test files should not be synced?
  3. How to transfer testing files to your continuous testing server?

Repeato keeps all its test-related files in a workspace, a basic file directory that holds all test files and test result data.

One way to get your tests synced to other teammates (or to your Continuous Integration server) is to start versioning your workspace directory with git. 
Another way is the Repeato Workspace Cloud Sync.

Syncing your workspace via Cloud Sync

Workspace Cloud Sync lets teams sync a shared workspace in just a few clicks.

A workspace in Repeato is a local folder that contains your tests, configuration, and other project files. With Cloud Sync enabled, this workspace is uploaded and synchronized across your team.

Key points

  • Local-first: Repeato stores workspace data locally by default.
  • Easy setup: Enable Cloud Sync in the Workspace module, confirm the required checkboxes, and choose a workspace name.
  • Team collaboration: Invite team members, who can then access the shared workspace via Switch Workspace.
  • Full workspace sync: Repeato syncs all files in the workspace folder, including tests, scripts, documents, test run results, and batch run reports.
  • Edit protection: Repeato prevents the same test from being edited by multiple users at the same time.
  • Activity log: A chronological log shows recent workspace changes.

This video shows how to enable Workspace Cloud Sync and start collaborating with your team.

Syncing your workspace via Git

How to start versioning test automation files via Git?

There are many different ways to create a new Git repository. We provide documentation on how to set it up either via Command line or the Sourcetree Git client. Be aware that in any case, Git needs to be installed on your system before you proceed.

Create a new Git repository via Command line (CLI)

  1. switch to Repeato-Studio and click “Workspace” in the main menu
  2. copy the “Workspace path” to your clipboard
  3. open a terminal and execute cd [workspace path from your clipboard]
  4. execute git init
  5. execute git add .
  6. execute git commit -m "Initial commit"

Create a new Git repository via command line via Sourcetree graphical Git client

  1. Download a git client such as Sourcetree
  2. Open Sourcetree and click “New”, then select “Create local repository”
  3. Switch to Repeato-Studio and click “Workspace” in the main menu
  4. Copy the “Workspace path” to your clipboard
  5. Switch back to Sourcetree, paste the path and click “create”
  6. Now in the repository list, stage all files by clicking on “unstaged”
  7. Click “commit” (commit message is up to you, could be “initial commit”)

Now all the changes you apply to the repository (add tests, rename tests, etc…) can be saved as a new version in your git repository:
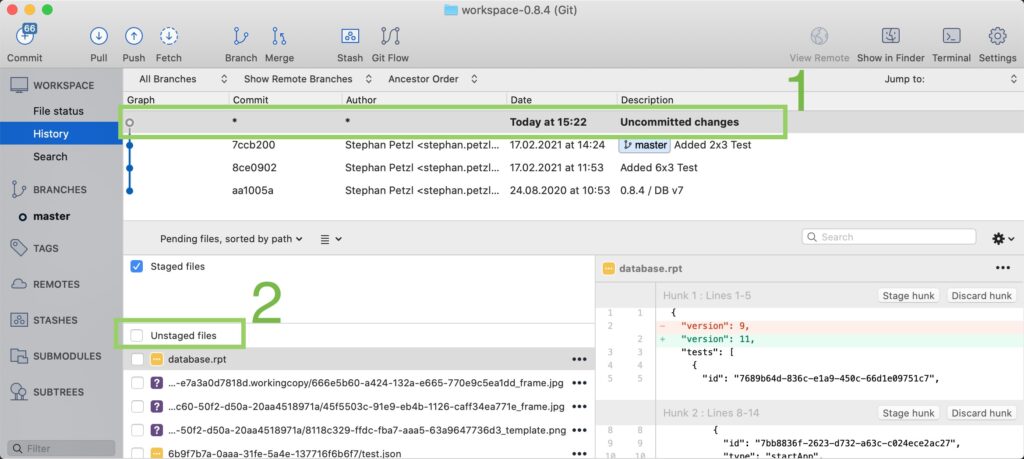
  1. After adding or changing some tests with Repeato, open Sourcetree again. You see that there is a new row in the history table with the title “Uncommitted changes” (1)
  2. Below there is a list of “Unstaged files”. You can click the check box next to the “Unstaged files” label, to “stage” all changed files.
  3. Click “Commit”, and enter some version information (like “Added new login test for MyCalendar app”)
  4. Click “Push” to upload all files to GitHub.
share tests with team via Sourcetree
SourceTree gives you a nice overview of what files have been changed (2).

How to get the changed tests from your teammates

To get changes that have been created somewhere else (on a workstation of your coworker), we need to make sure that your files find their way on to a Git server (such as Github), from where they can be accessed by everybody on the team.

  1. Create a new git repository online. A repository is a place in the cloud, where your workspace directory will be uploaded. Here is how you can create a repository on github.
  2. Add the online repository as a remote to your local repository:
    git remote add origin [your repo URL]
  3. To pull changes from GitHub, just click the “Pull” button in Sourcetree and all the changes will be downloaded to your workspace directory.

If you open Repeato, it will be observing the workspace directory, and instantly refresh to reflect the changes.

Benefits of using Git for syncing files?

Using git gives us some powerful possibilities when working with tests:

  • Versioning support, for example if want to check if an older version of your app had some problem with a certain test. Versioning allows you to always go back to one of the previous versions of your testing setup.
  • Git provides many useful features, such as branches, and it runs on every OS.
  • You can easily integrate Git into your build and testing CI (Continuous Integration) workflow.
  • De facto, Git is the standard for versioning files and for working on files in a team.
  • Git allows you to version your test within the same repository as your source code. When you check out the old code, you get the right version of tests automatically.

Which test files should not be synced?

Besides the files needed to run and edit your tests, a Repeato workspace also contains a backup directory. The .gitignore file inside the workspace directory excludes this directory by default. Thus, you are all set and don’t need to care about further configuration.

However, you might also decide not to version other directories like the test run data. Read more on how to exclude files from git.

How to transfer testing files to your continuous testing server?

There is obviously also a way to automate pulling your changed tests before running them as part of your CI flow. 

Here is what to do if you want to update the files manually:

  1. Commit your tests via Git (see above) and push the changes to a git repository
  2. Log in to your continuous testing server via terminal
  3. Clone or pull the changes from your online git repository

Repeato

  • Home
  • Pricing
  • Blog
  • FAQ
  • About us

Documentation

  • Getting started
  • Test exception handling
  • Advanced testing techniques
  • JavaScript API
  • Release notes

Support

  • Support & Resources
  • Documentation
  • Book a demo
  • Contact

Legal

  • Imprint
  • Terms & Conditions
  • Privacy policy
  • Cancel subscription
Repeato Reviews
[activecampaign form=5 css=0]
Manage Cookie Consent
To provide the best experiences, we use technologies like cookies to store and/or access device information. Consenting to these technologies will allow us to process data such as browsing behavior or unique IDs on this site. Not consenting or withdrawing consent, may adversely affect certain features and functions.
Functional Always active
The technical storage or access is strictly necessary for the legitimate purpose of enabling the use of a specific service explicitly requested by the subscriber or user, or for the sole purpose of carrying out the transmission of a communication over an electronic communications network.
Preferences
The technical storage or access is necessary for the legitimate purpose of storing preferences that are not requested by the subscriber or user.
Statistics
The technical storage or access that is used exclusively for statistical purposes. The technical storage or access that is used exclusively for anonymous statistical purposes. Without a subpoena, voluntary compliance on the part of your Internet Service Provider, or additional records from a third party, information stored or retrieved for this purpose alone cannot usually be used to identify you.
Marketing
The technical storage or access is required to create user profiles to send advertising, or to track the user on a website or across several websites for similar marketing purposes.
  • Manage options
  • Manage services
  • Manage {vendor_count} vendors
  • Read more about these purposes
View preferences
  • {title}
  • {title}
  • {title}