
Reporting
You can export test results as PDF or HTML reports and publish them to TestRail, Jira, or Slack.
Exporting a single test run result as PDF
Section titled “Exporting a single test run result as PDF”For each test run, you can easily create a pdf report. The report will contain all the relevant information for the developer to fix an issue.

Click the “Reports” icon in the header section of your test to generate a PDF report
This is an example of a Repeato report:

Generating a batch run report
Section titled “Generating a batch run report”You can export a whole test batch run as an HTML report.
The quality (and thus the file size) of the report can be configured in the settings of Repeato.
The reports contain a filterable and searchable list of tests:

For each test, Repeato records and stores a history of profiling information. This can help to detect regressions in your app.

Performance metric reports
Section titled “Performance metric reports”Repeato batch run reports contain following performance metrics:
-
App startup time: The time your app took to start. If this increases significantly, this might indicate that a piece of code is creating additional workload. The reason could be a new library that was integrated or some other piece of code that runs slow. 👉 Tip: Ask a developer if the workload can be deferred to a later point during or after app startup, so the user experience stays good.
-
Test run duration: The time this test took to complete. If test runs become slower, there could be several reasons for it:
- Your app is fetching data from a server, and the server is slow. 👉 Ask the dev team what can be done about it
- Your app is fetching data from a server, and the internet connection is bad. 👉 Talk to the dev team about the user experience of users with low bandwidth internet connections, maybe you can improve the UX via caching, or lazy loading content)
- Some process inside the app is taking longer than usual. 👉 You should definitely mention it to the dev team; they might not be aware of it.
-
Skipped frames count: When the app is doing too much work at once, there is a potential for it to freeze. This results in a bad UX: the users can feel that the app is getting stuck and doesn’t respond smoothly. 👉 You should definitely mention it to the dev team; they might not be aware of it.
Exporting a test result as a Jira issue
Section titled “Exporting a test result as a Jira issue”Before publishing to Jira, it’s necessary to create a connector:
Click on “Settings” in the main menu. Then click the + button next to “Connectors”. Then enter all the information needed for connecting to Jira:

Hit “Connect to Jira” and you are ready to go.
After the test run, Repeato will have all the interesting metadata ready for your report: App version, install and update time, device model, and Android or iOS version.
Click on the report icon in the header of your test to export test results as Jira issues
For each of the executed test steps you can select a screenshot that gets attached to the Jira issue:
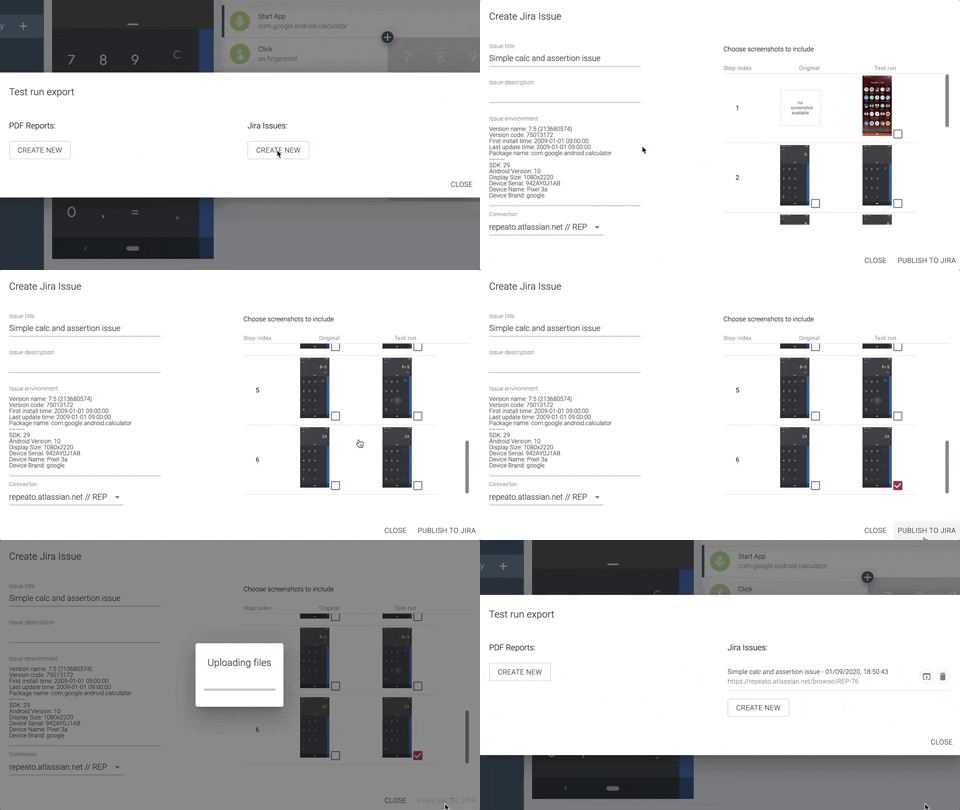
The left column of screenshots shows the ones taken during recording of the test. The right column shows the screenshots taken during test execution.
Publishing test results to TestRail
Section titled “Publishing test results to TestRail”The TestRail connector links Repeato tests to TestRail cases and publishes the latest results to an existing or new TestRail test run.
Prepare TestRail
Section titled “Prepare TestRail”- In TestRail, open Administration → Site Settings → API.
- Enable the API and save the settings.
- Open your TestRail user settings and select the API Keys tab.
- Add a key, give it a descriptive name such as
Repeato access, and copy the generated token. - Click Add Key, then save the user configuration. The key is not stored until you save the configuration.
Configure the connector
Section titled “Configure the connector”In Repeato Studio, open Workspace → Connectors, add a TestRail Connector, and enter:
- TestRail URL: The URL of your TestRail installation, for example
company.testrail.io. - Project ID: The numeric ID shown in the URL when you open the TestRail project.
- Suite ID: The numeric ID of the suite you want to use by default. You can leave this empty if it is not needed for your project.
- User Email: The email address you use to sign in to TestRail.
- API Token: The token generated in your TestRail user settings.
Click Connect to TestRail to verify and save the connector.
Publish a batch run
Section titled “Publish a batch run”- Add tests to the batch runner and run the batch.
- When the run finishes, click Export, then Export, upload and publish to TestRail.
- Select an existing TestRail run or create a new one.
- The first time you publish a Repeato test, map it to the corresponding TestRail case. Repeato stores this mapping for future exports.
- Click Export and publish.
Repeato updates each mapped TestRail case with its result and a link to the uploaded batch report. The report compares the last successful screenshot on the left with the most recent test-run screenshot on the right.
The linked TestRail case is also displayed in the Repeato library and test editor. To publish an individual result, run the test, open Export test result, and publish the latest run to TestRail. Repeato attaches a generated PDF report to the result.
Automatically generating reports after each batch run
Section titled “Automatically generating reports after each batch run”This is possible via the “Advanced Configuration”. First navigate to “Workspace” (Repeato 1.8 and before: Select “Settings”) and open the “Advanced Configuration” panel:
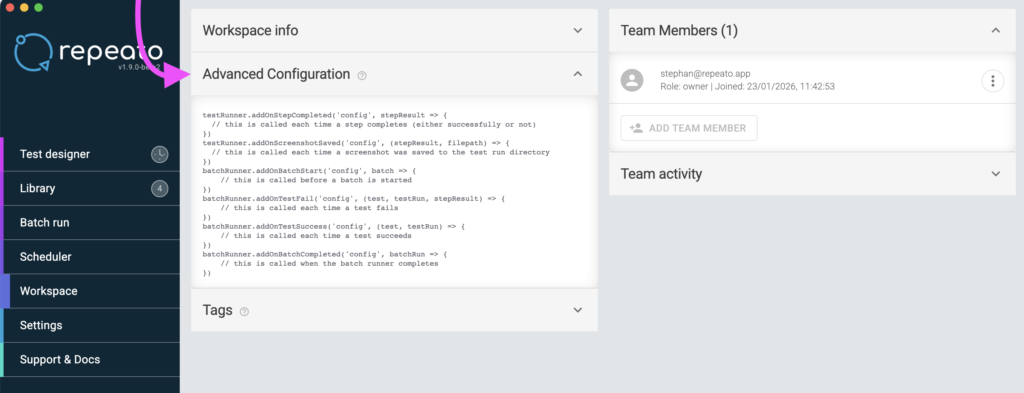
Then click the configuration code block. An editor will be shown. Choose “Some code examples”:
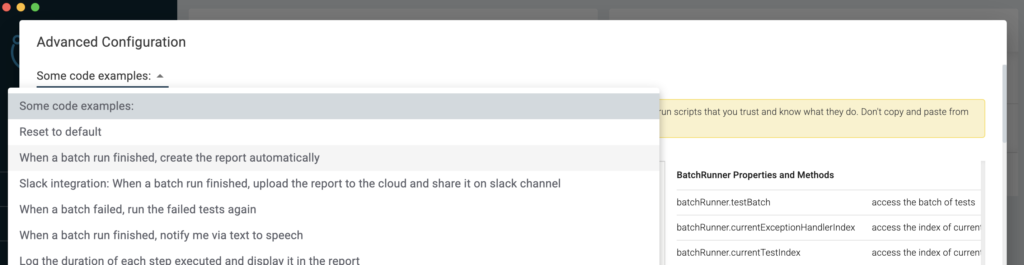
Select “When batch run finished, create report automatically”, then click “APPLY” to save and close the dialog.
Automatically posting reports to Slack after each batch run
Section titled “Automatically posting reports to Slack after each batch run”Repeato provides example code on how to configure this behaviour.
- Open the “Advanced configuration” (Main menu “Workspace” (Repeato 1.9) or “Settings” (Repeato 1.8))
- Select “Slack integration: When a batch run finished, upload the report to the cloud and share it on slack channel” from the list of examples.
- Create a Slack webhook URL:
Create a new app at https://api.slack.com/apps, 4. Enable “Incoming Webhooks” in the settings 5. Click “Add New Webhook to Workspace”.
Copy the webhook URL, switch back to Repeato-Studio Replace the webhook URL in the source code Click “APPLY” and run your batch.
For reference, here is the example code. The webhook URL needs to be configured in the first line:
const WebhookUrl = 'https://hooks.slack.com/services/aaa/bbb/ccc' // <-- REPLACE WITH YOUR WEBHOOK URL!
batchRunner.addOnBatchCompleted('config', async (batchRun) => { const reportPath = await batchRunner.createBatchRunExport() log('Created report: ' + reportPath)
log('Uploading report...') const reportUrl = await batchRunner.uploadReport(reportPath, new AbortController()) log('Uploaded report: ' + reportUrl)
let message = batchRun.wasSuccessful ? \`✅ Repeato batch run finished successfully\` : \`❌ Repeato batch run failed: \${JSON.stringify(batchRun.stats)}\`
message += '\\n' + reportUrl
await axios.post(WebhookUrl, {text: message}, { headers: { 'Content-Type': 'application/json' } });})